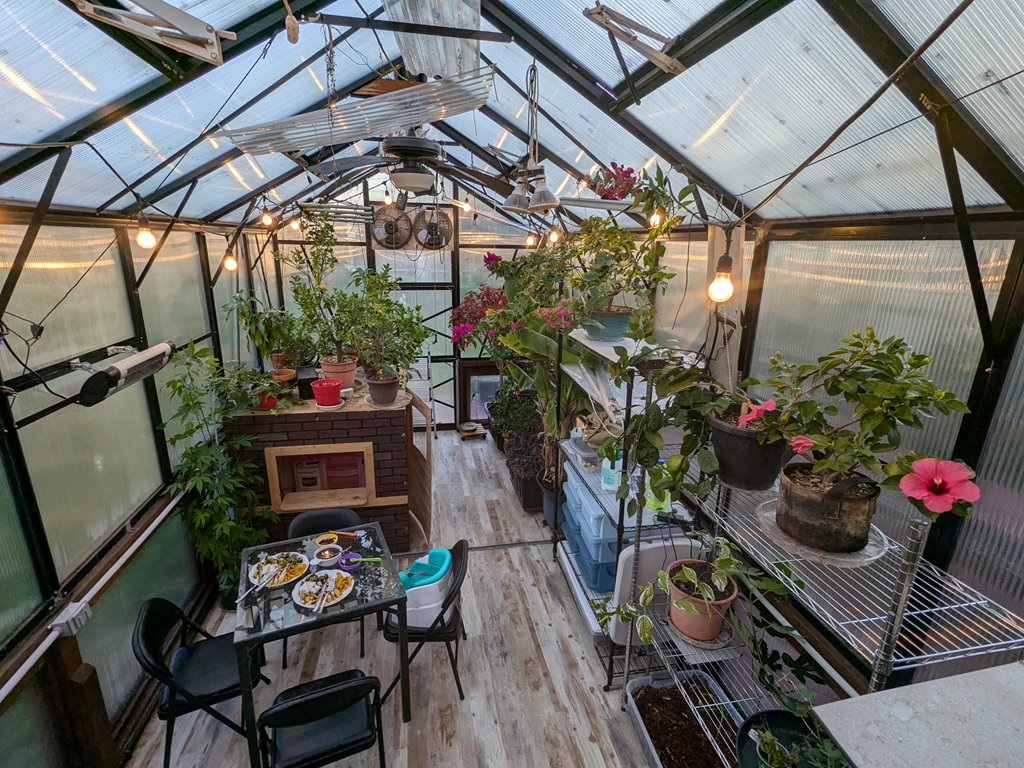
It’s been a remarkably warm fall so far but cooler October days are coming up, dipping down into the 40s next week. That means it’s time to get all the plans into the warm greenhouse so this Saturday was “greenhouse move-in day” where we get all the plants we took out of the greenhouse in early summer moved back in.
Not everything is in it’s final spot but I’m pretty happy with the first pass!
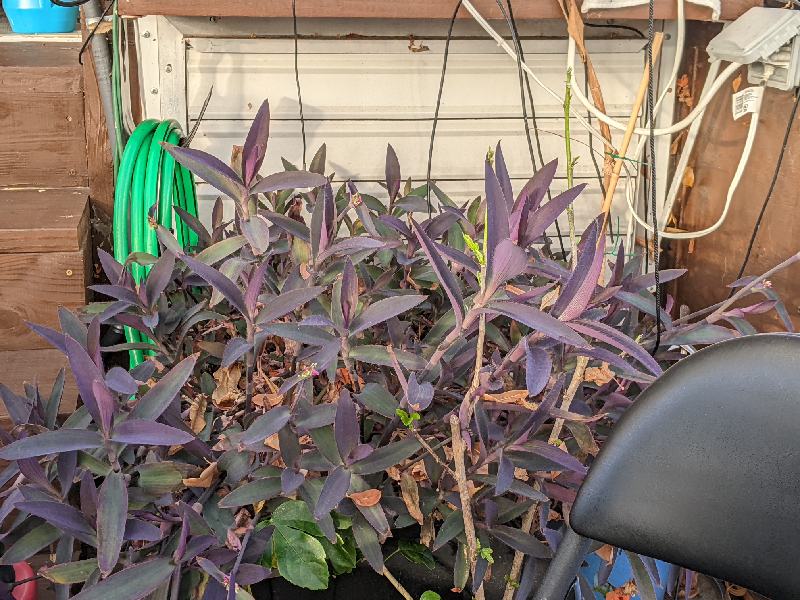
It has been the depth of Pittsburgh winter her recently with snow on the ground for several weeks in a row and weather in the teens. Since it rained and then froze, everything is icy too. Yesterday I spent a good hour shoveling the sidewalk and cars to scrape the ice off of everything. Today dawned cold but sunny and the whole day has been super sunny. The greenhouse has been an incredible joy with the warmth of the sun with the cool air as the vents let in a refreshing breeze. I even threw a pillow on the ground and took a snooze amidst the plants. I’m hopeful that the plants can be starting to recover as we get more sunny days and start edging our way towards March, where it really does start getting quite a bit more sunny. I thought it would be worth highlighting one of the plants in the greenhouse that has done the best over the years, consistently doing well: the purple queen. It’s surprisingly immune to almost anything and just keeps trucking and being awesomely purple. It gets a bit leggy and needs some pruning but just wanted to say congrats purple queen, you doin’ great!
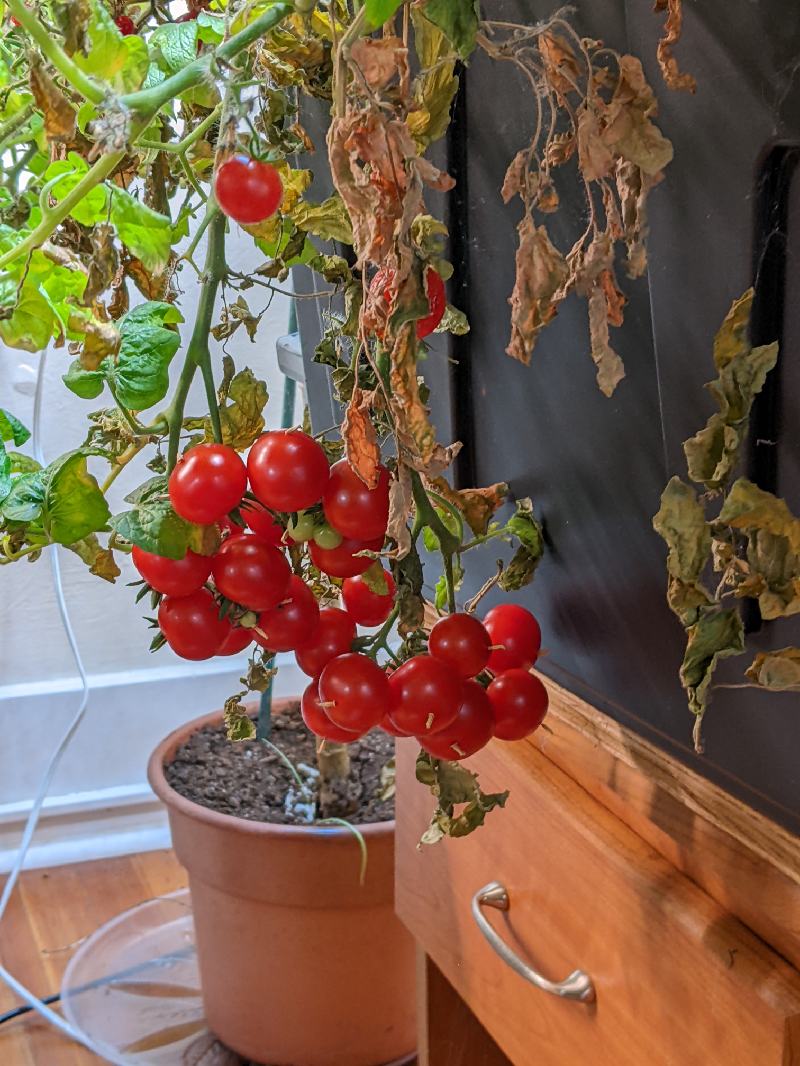
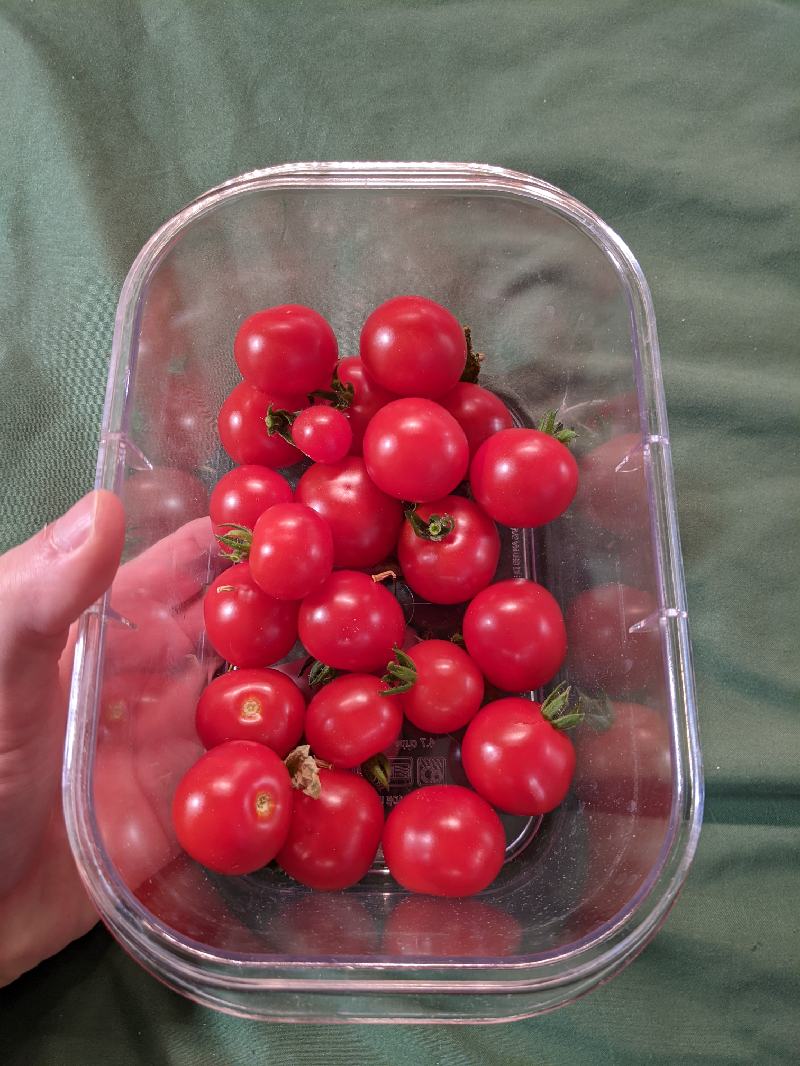
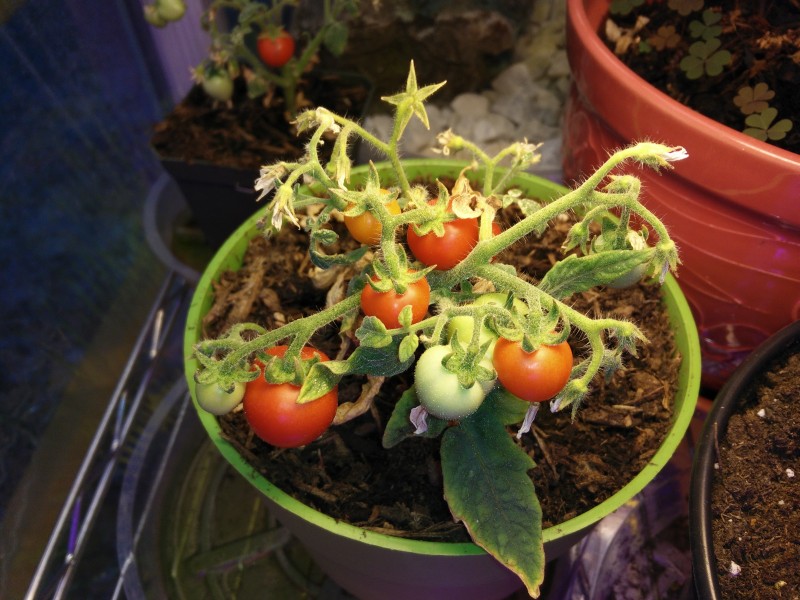
So almost two years ago I started an experiment to see how well Micro Dwarf Tomatoes could be grown indoors and outdoors and which varieties produced and tasted the best: 2020.05.08: Micro Dwarf Tomato Experiment, Day 0. It turns out micro dwarf tomatoes can do spectacularly well indoors because here it is 642 days later (nearly 2 years) and I’m still harvesting lots of tomatoes! I think only a few of the 10 original varieties I planted are still around and kicking and we’ve been through two spider mite and one white fly infestations (resolved with the help of beneficial insects).
Still getting delicious tomatoes off my indoor micro tomatoes! 20+ tomato harvest!
The coolest thing about these tomatoes is I haven’t even really tried to keep them alive, they just kinda sit in my office. I’ve mostly just kept watering them, periodically throwing some Miracle Gro, and harvesting tomatoes when they become ripe. I’ve been super impressed!
A few of my tomatoes and peppers have germinated. I didn’t have great germination rates, possibly because it was too damp and some algae started growing. But that’s OK, two tomatoes and a pepper should get me started in 4-6 weeks when the sun starts returning and the greenhouse starts warming.
The weather has been quite cold outside, it’s been below 10 F for three days in the past week and some days haven’t gotten above 20 F. The greenhouse has been doing pretty well temperature-wise, it hasn’t been below 60 F and on one of the sunny days even made it up to low 80s!
It’s 2022! Pretty crazy, and winter is hitting full force here in Pittsburgh. We’ve had single digit lows and snow on the ground for a week now. I overwatered the greenhouse and with the cold temps and not much light (even with grow lights), most everything is doing a bit poorly – lots of yellowing and leave loss. Hopefully things will turn around in a couple of months when spring starts arriving. I did up the temperature in my greenhouse a few degrees from 65-70 range to 68-73 F because it always felt a little too chilly to me. But to take advantage of those cooler temperatures, I planed a bunch of cool weather crops: romaine lettuce, sugar snap peas, bok choy, mustard, and cilantro. They are just starting to come up! Hopefully I’ll be able to get a harvest before the increased sun in March spikes the greenhouse temperatures.
Peas and bok choy just starting to sprout in my greenhouse 4′ x 2′ x 6″ plastic “under the bed” storage bin.
I also was doing some research on new micro tomatoes and discovered a few new varieties to try: Siam, Red Velvet, Cocoa, and Heartbreaker Twiggy. On the pepper side, I’ll also try pot-a-peno and fresh bites, both dwarfs.
Today I was encouraged to spend less time on screens and media consumption. Not entirely sure how I feel about this challenge, but I have been wanting to spend some more time gardening and on activities that I’ve just felt too lazy to do. Back in grad school, I did a #365days project with some friends where you take a picture of yourself every day for a year. I’ve periodically thought it would be cool to do something similar with my gardening & greenhouse to help motivate me to do just a bit of gardening each day. So here’s to trying that out. Day 1. Not sure how far I’ll get, maybe I’ll stop tomorrow, but let’s see 😛 I’d like to give myself some grace here so if I manage to get 5 out of 7 days a week, that would be wild success in my book. 1 day out of 7 would still be quite successful too 🙂
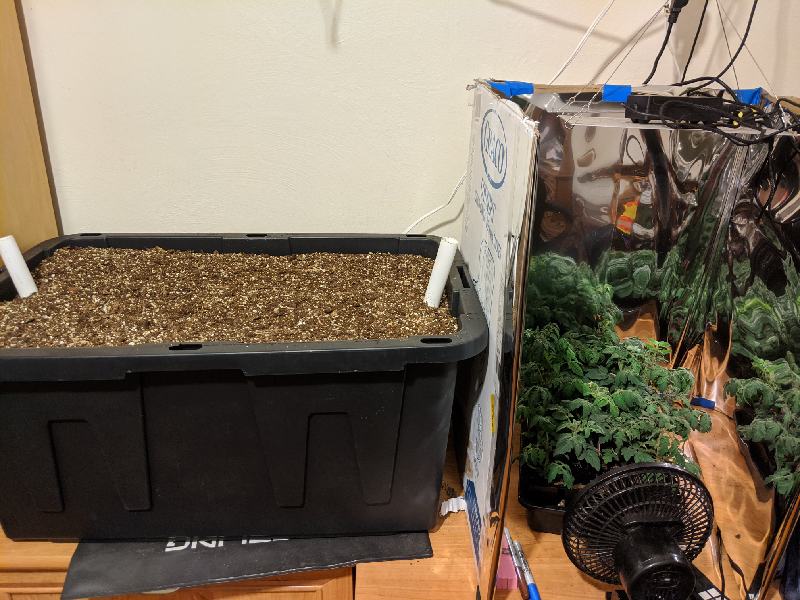
So today it was hot, 85 F or so, and I spent some time in the greenhouse building a new 74″ shelf I got. My plan is to have 27 gallon sub-irrigated totes on the bottom, a 48x18x6″ plastic storage bin in the middle, and then some potted plants on top. I calculated I have 22″ and 19″ of height for the grow lights, which will be tight but hopefully doable.
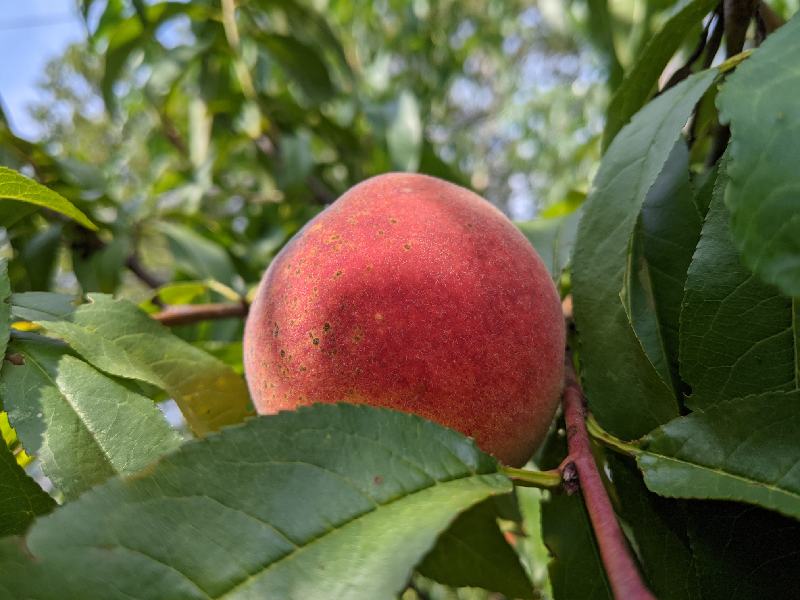
In other news, my peach tree continues to give peaches. I didn’t thin them enough so they are small and have a lot of bugs/rot but still pretty tasty – generally way better than most store-bought peaches! I figure I have another week of peach harvest for the year.
Last year my mango got scale and I fought it all year with not too much success (horticultural oil, scrubbing with toothbrushes dipped in insecticidal soap, neem oil). I noticed this week that the scale had spread to many other plants in my greenhouse and office 🙁 So I swung into action and applied the systematic imidacloprid as a soil drench. Banned in the EU for outdoor use because it is toxic to bees, I was a bit nervous. However, given it’s sub-freezing outside and I’m only applying it to indoor plants in the dead of winter and the EU ban exempts closed greenhouses, I’m hoping it won’t do too much damage to use it indoors – and hopefully stop the scale!
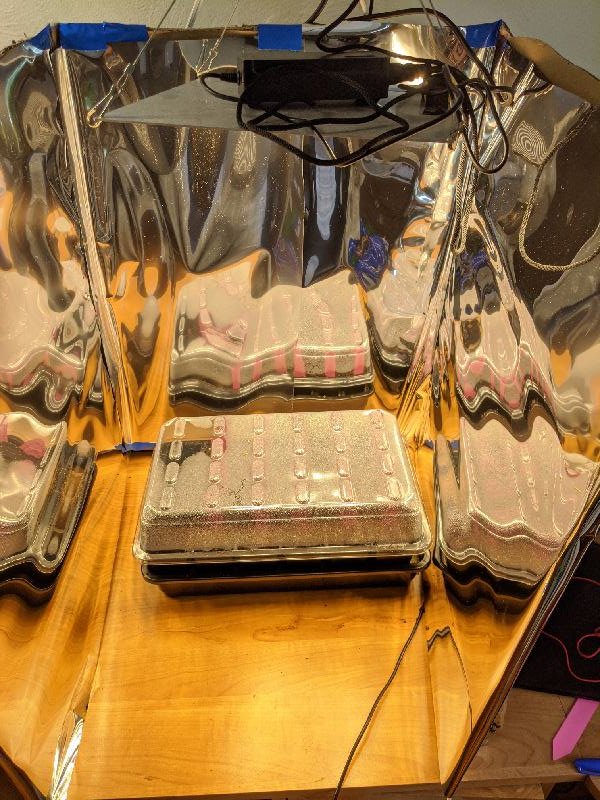
With working from home dragging on, I’ve been slowly upgrading the room I’ve been using as an office with grow areas. I already had a grow area before on my desk, but now I’ve upgraded it. I bought a 42″ dog crate pan which is 1″ high so I could fill pots and put it on there to catch any run-off watering. Since this is a bigger space, I upgraded the grow light to two HLG QB120’s and added reflective walls on three sides. I debated all four sides but I really wanted to see the grow space and let the light spill into the room. I’m growing micro-dwarf tomatoes, a small banana, and have some flower seeds started to transplant into the space. I also have a larger banana next to the desk. Surprisingly, my micro-dwarf tomatoes by the door just sitting ontop of a bed side table are still going strong (unlike my outdoor ones which blight and cold weather finally did in). And one level of my bookcase has been converted to a seed-starting station, which is cool too.
So overall, as we go into the winter, I’m looking forward to the greener space on my desk and throughout the office room.
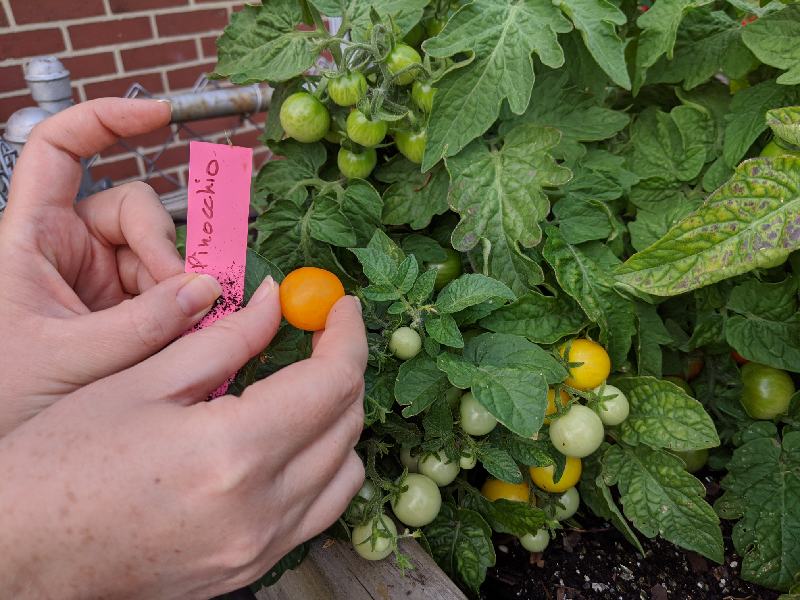
First harvest!! Just under 3 months from seed, both the Bonsai and the Pinnochio tomato plants had two ripe tomatoes and a bunch of other varieties like Window Box Red are looking close.
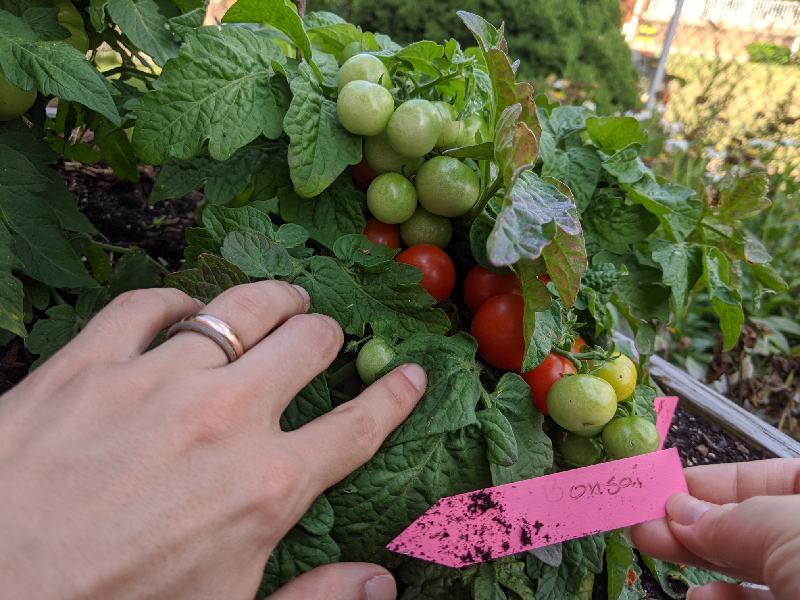
First Bonsai tomato harvest!
Given we found two ripe ones of each, my wife and I did a taste test. The Pinnochio was a yellow and a bit smaller. It had a sharp burst of flavor, decently sweet but with some acid. The Bonsai was red with a bit larger fruit. It had a milder, more classic “red tomato” taste and was juicier. We also compared to a more traditional “Sweet Million” grown in my greenhouse. The main difference was the Sweet Million was much sweeter 🙂
Indoors, we are seeing some more plants setting tomato fruit and a few varieties like the Bonsai are seeing some fruit starting to turn red.
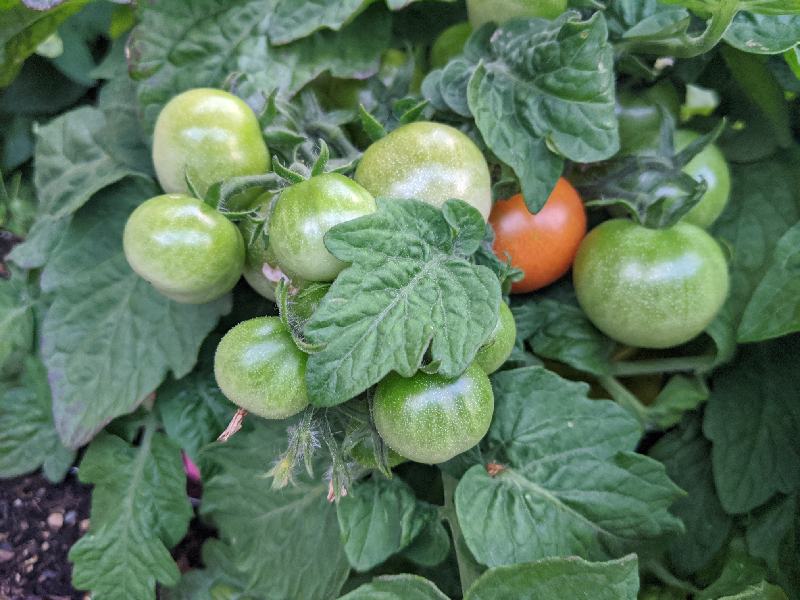
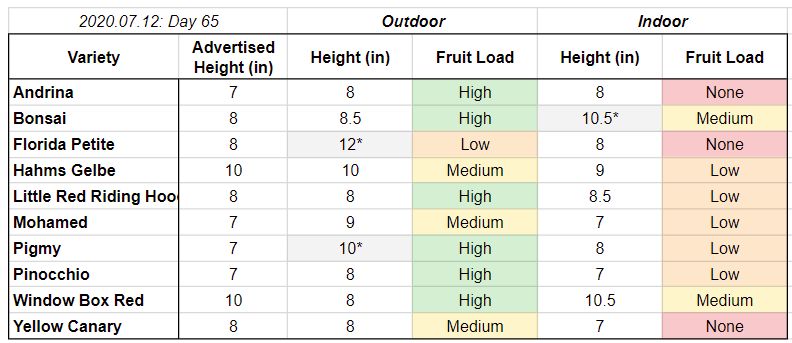
Two months in and my 10 outdoor micro-dwarf tomatoes are doing great! Most have lots of fruit. I measured the rough height and an approximate estimate of how much fruit there was on the plant.
Micro-dwarf tomato status across the 10 different varieties. * means more than 2″ from the advertised height
Some interesting trends:
Indoor plants have much less fruit than outdoor plants. Apparently I haven’t been doing a good job of pollination (I have a small fan but must need more). Most indoor plants only have a few fruits and some even have none.
Florida Petite is struggling on the fruit production both indoor and outdoor.
A few plants are more than 2″ taller than the advertised height, including Florida Petite (outdoors), Bonsai (indoors), and Pigmy (outdoors).
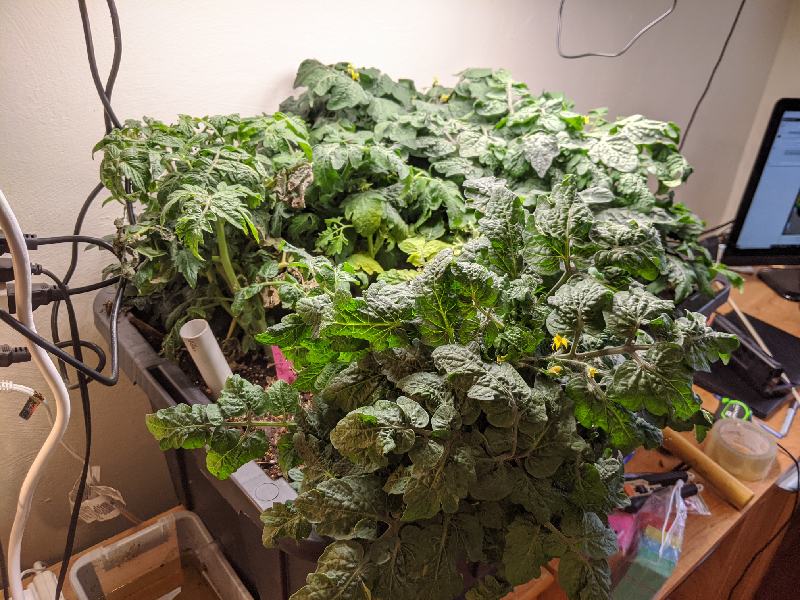
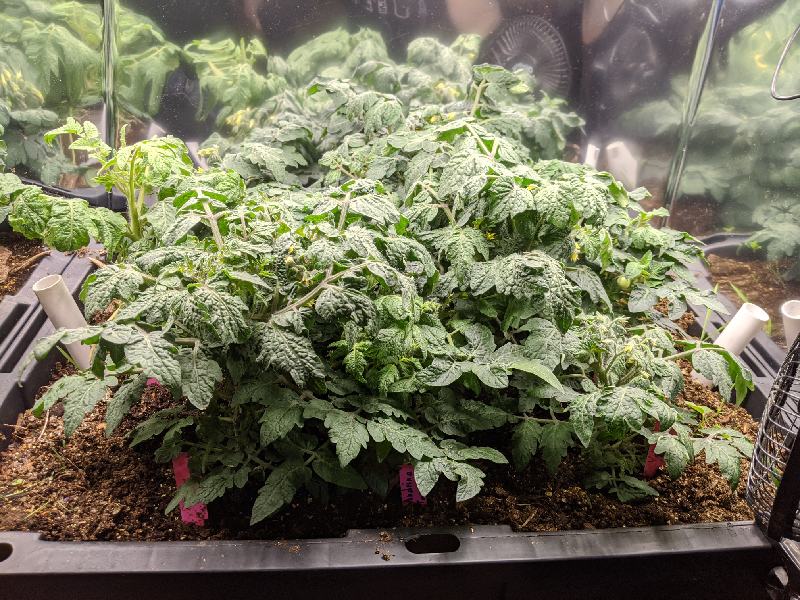
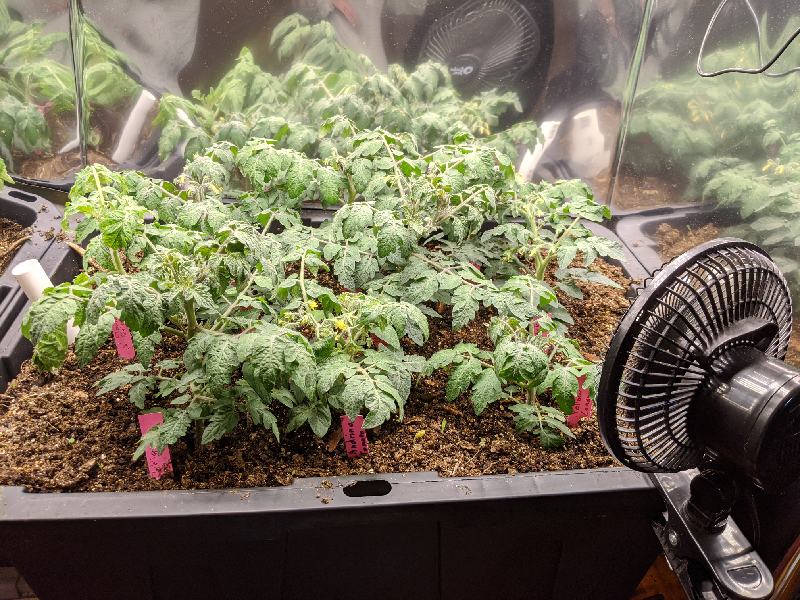
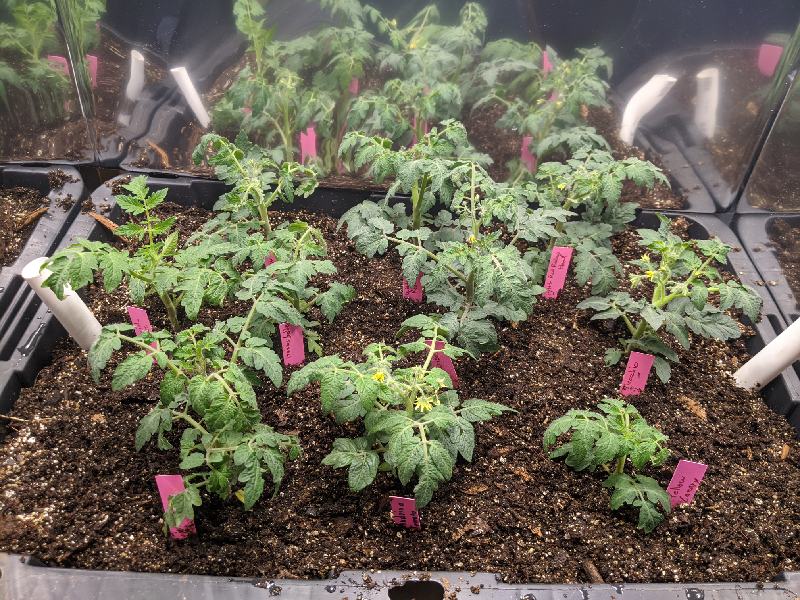
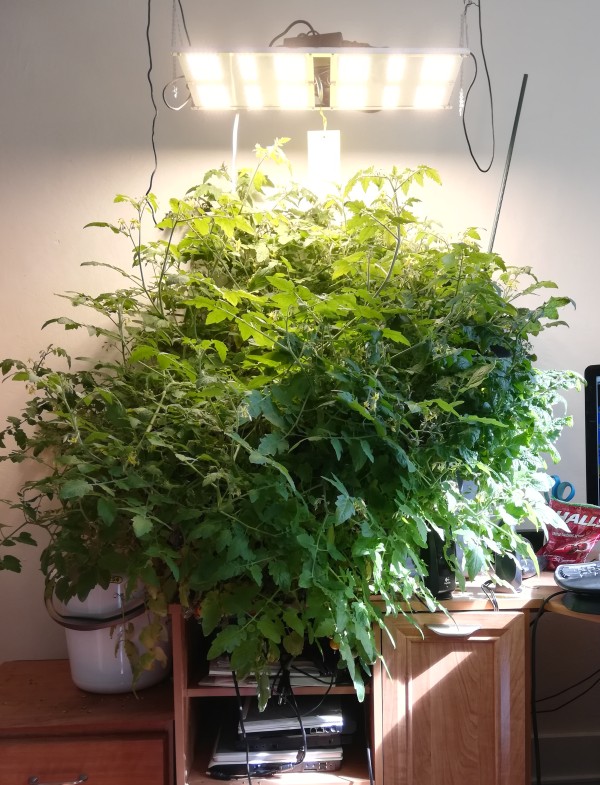
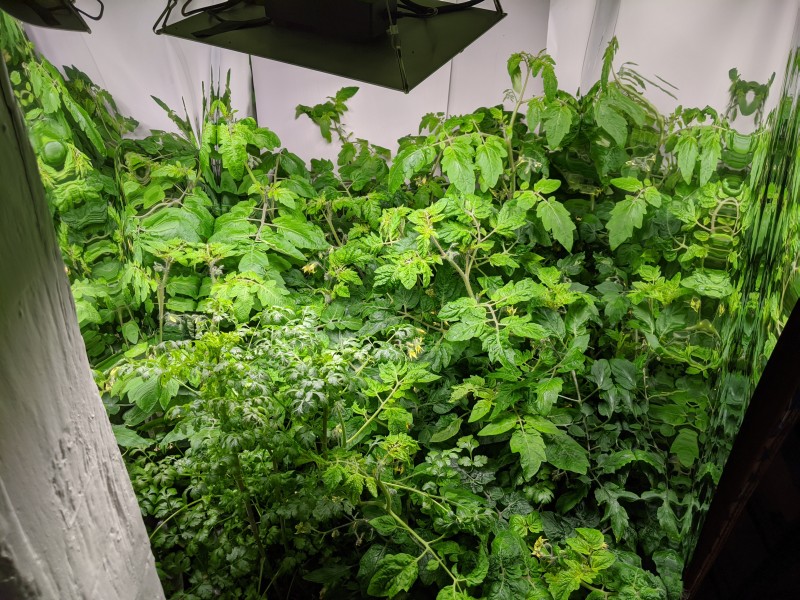
So yes, I can say definitively that planting micro-dwarf tomatoes 6″ apart is too close together and now I have one giant tomato carpet 😀 Unfortunately, I think my results will be less accurate now because some of my plants are being shaded by others quite a bit. In fact, my Bonsai plant near the center is really taking over. I’m going to move these indoor plants to a different location in this room under one Mars Hydro TS600 light so I can try something different in this space.
All 10 of my micro-dwarf tomatoes have kind of melded together
Two weeks after transplanting into the sub-irrigated bin indoors, the tomatoes are taking off! So much so that I probably put them too close together, even though I put them 6 inches apart. I fertilized both the indoor and outdoor tomatoes to keep them well nourished.
The micro-dwarf tomatoes are all growing together but aren’t getting very tall, which is good. Outdoor micro dwarf tomatoes are starting to have some small tomatoes!
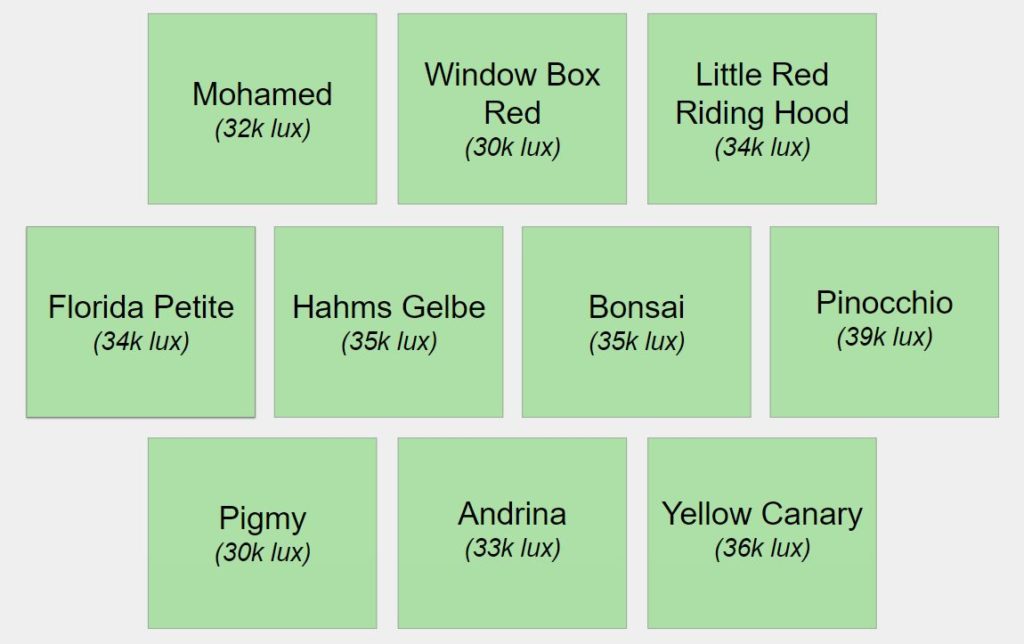
Arrangement of tomato plants with light intensity measurement.
I have two QB120 HLG lights with reflective sides around the back and sides of the sub irrigated bin. I measured the light intensity, which varied between 30k and 39k lux. Normal sunlight is ~100 lux, so on average I’m operating with 1/3 power of the sun. However, I do have the lights on 15 hours a day without cloud cover so maybe closer to half the DLI of the sun or a tomato plant that gets half a day of sun. I also added a fan to keep some circulation and hopefully wind pollinate the tomatoes.
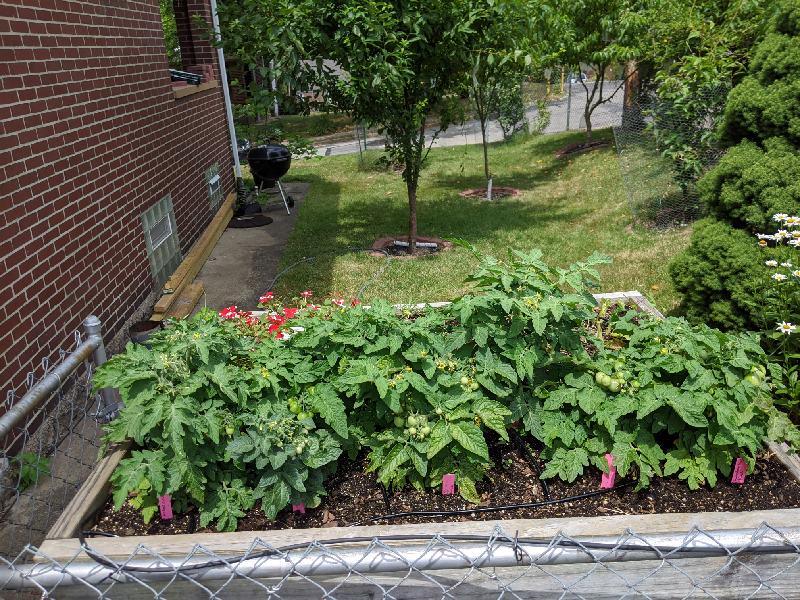
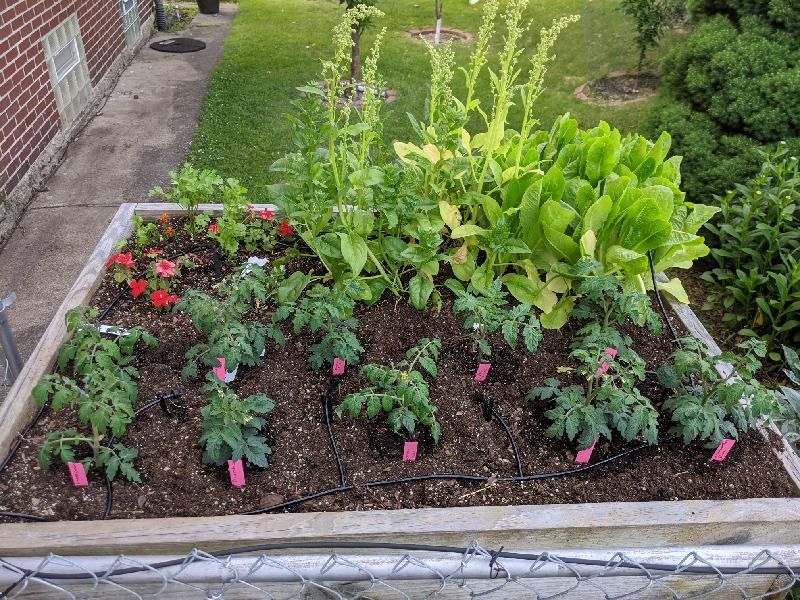
After hardening off, I planted one of each of my 10 varieties in my designated outdoor garden plot (well the front half of the raised bed). It sits over my compost pile so is more of a large container than raised bed, but has drip irrigation that provides it with water so it doesn’t dry out too much. Then also consider adding fruit trees to your garden as they look superb and also provide a bountiful supply of fresh fruit so are an amazing addition to any garden.
I now have one variety growing indoors and one variety growing outdoors so it will be interesting to see how each environment does! The real game changer in getting your growing done is BuildASoil Potting Soil. My outdoors environment is less well controlled with regards to sunlight because you can see my house is to the right of the bed so as the afternoon progresses, the shade moves left to right across the bed. So for better or for worse, the tomatoes on the right side will see more sun.
Outdoor tomatoe plot full of 10 micro-dwarf tomatoes.
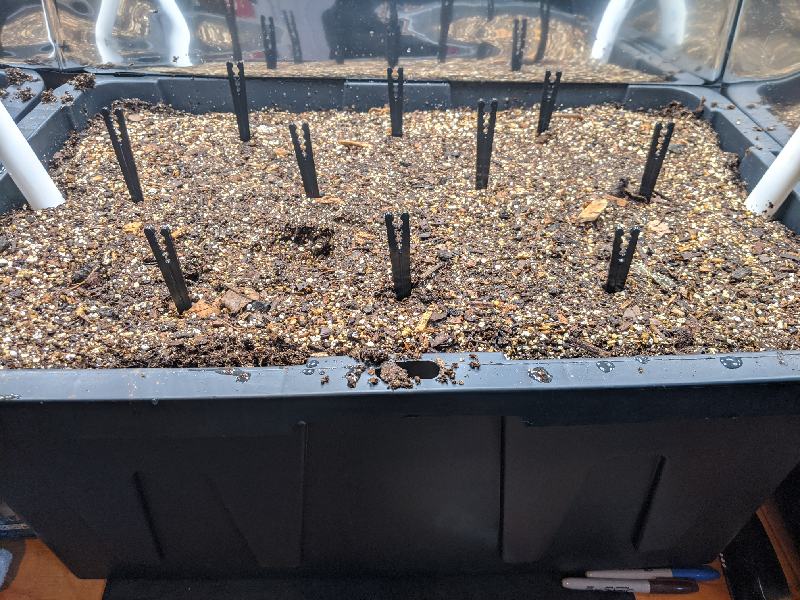
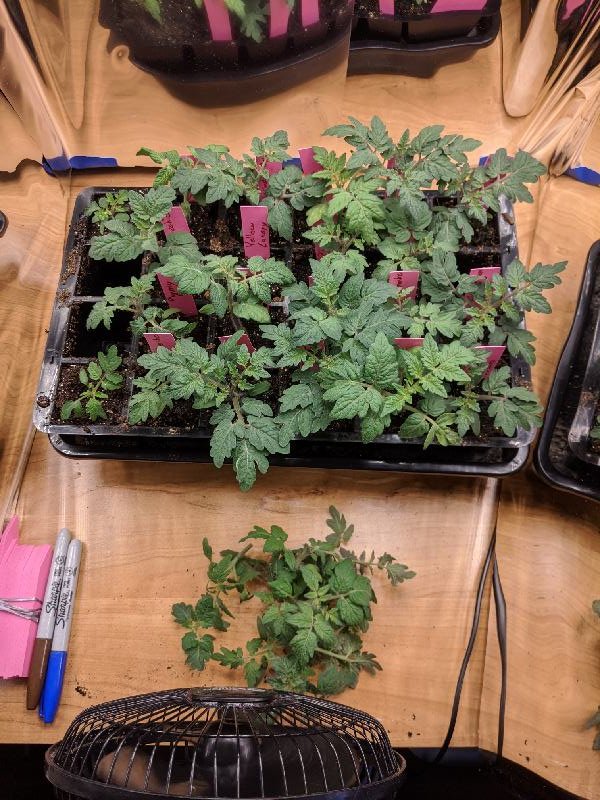
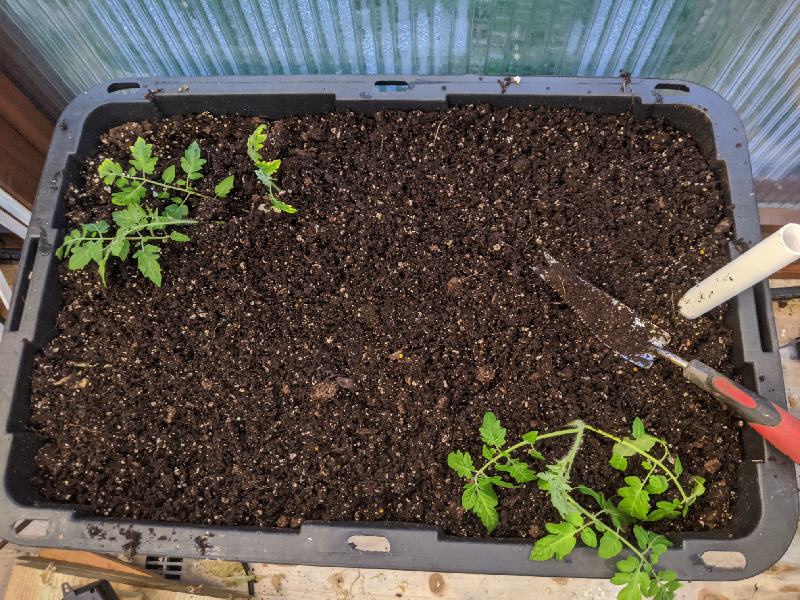
Since many of my tomato seedlings were already starting to flower, I’ve been meaning to transplant them. I think I got fooled on when to transplant because they are so tiny and dwarf! Tonight I was able to get around to transplanting the indoor ones into my 27 gallon sub-irrigated bin. I have 10 varieties so I spaced them out about 6 inches apart.
Spaced about 6″ apartAll 10 varieties of tomatoes transplanted.
They are so cute and tiny! 🙂 I still need to do some adjusting of the lights to make sure it’s reasonably well balanced, fertilize, and measure some statistics. I also need to transplant the outdoor ones as well, but that will come after a few days of hardening off.
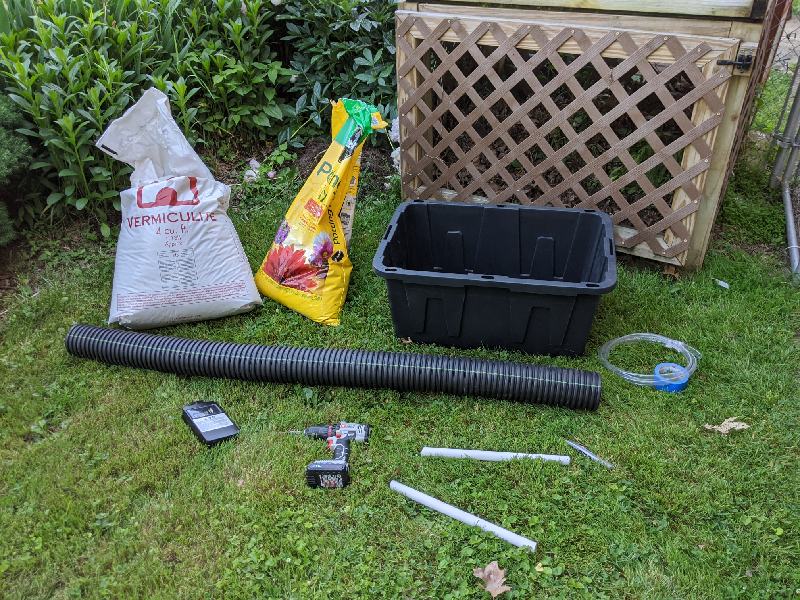
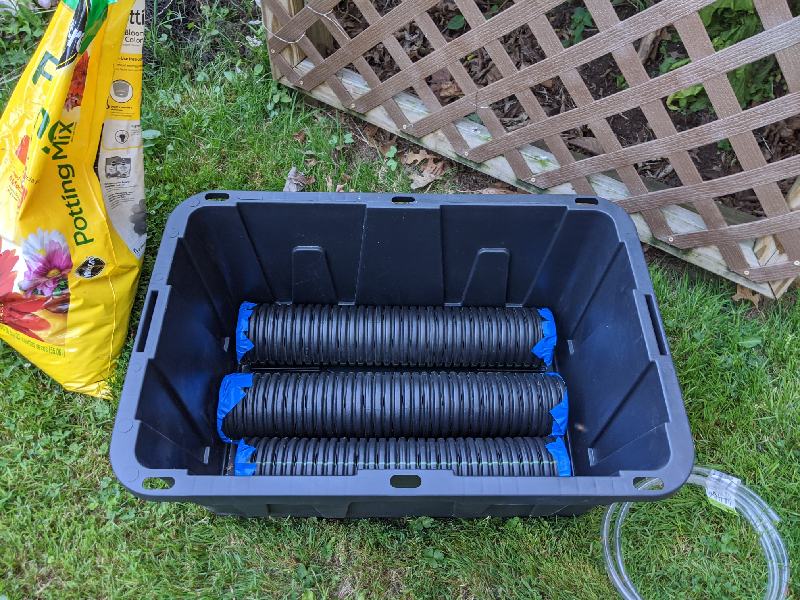
Today I spent some time creating a new sub-irrigated bin to put the tomatoes in. I used a pretty even mix of potting soil (aka peat moss & decomposed mulch), my own compost, and vermiculite. This will be the bin the tomatoes get transplanted to for the indoors part of the test.
Only 4 weeks into the experiment and just noticed tiny flowers are appearing! That’s pretty crazy. I guess I was underestimating how mature the seedlings were because they were so tiny. I think the next step for this weekend is to transplant them to their final locations.
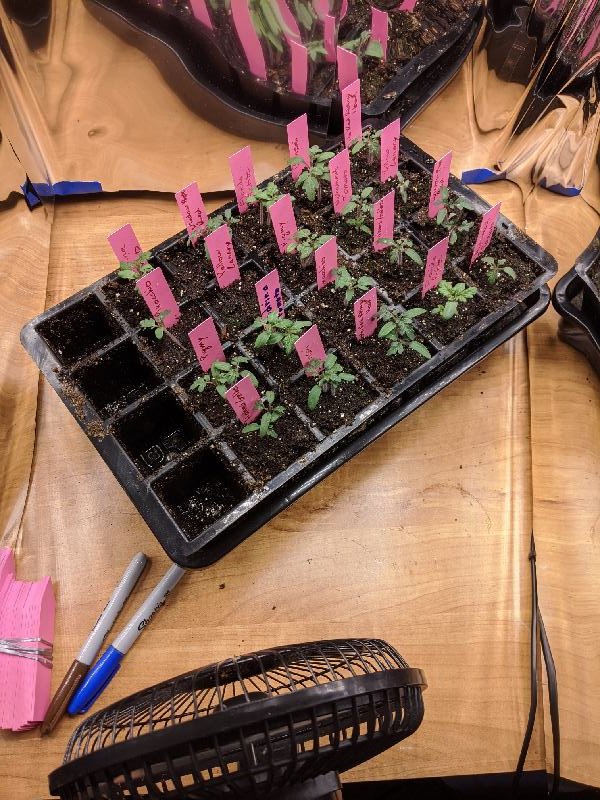
3 weeks in, I figured it was time to thin the tomatoes. Since I had planted two seeds in each square, some had multiple growing tomatoes. For each square that had two, I gave the smaller, weaker tomato the chop. I now have exactly two tomato plants for each variety.
The Yellow Canary had one square that had no plants and one square that had two plants so I carefully separated them out into two new squares. This definitely counts as different treatment, so I’ll record these results with an asterisk, but I was more interested in learning as much as I could even if the experiment wasn’t perfectly controlled.
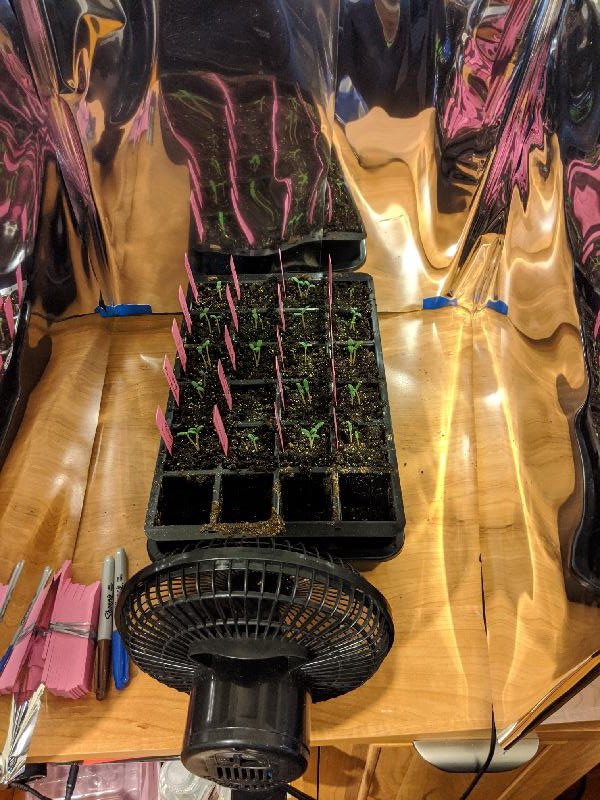
All of the cells are up except one of the Yellow Canary, which means I probably overlooked it when planting 🙁 Everything else is doing well and today I watered with half-strength fertilizer. I’ve also been rotating the seed flat periodically every few days to get light and airflow more uniformly distributed over time.
It’s Day 6 of the Micro Dwarf Tomato Experiment and almost all the tomato cells are up! Yellow Canary seems a bit slow, one cell has a half-sprouted tomato poking up and the other has nothing. I removed the clear plastic humidity lid and installed a fan.
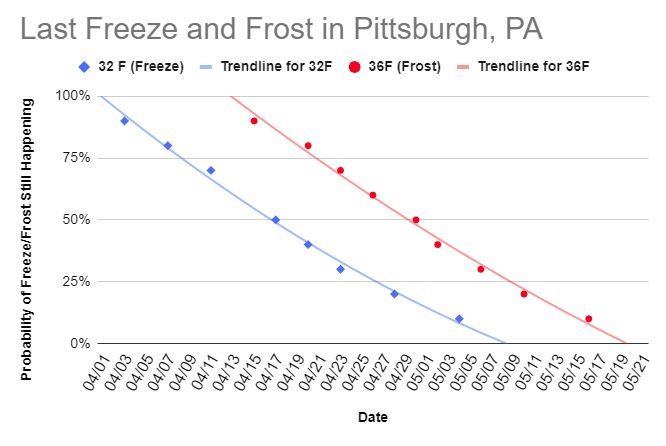
It’s May 9th and snowing! “Yes, Pittsburgh is in the upper-20s. That will make it the 8th time in our climate records that Pittsburgh has observed temperatures below 30 degrees in the month of May.” (source: National Weather Service (NWS) Pittsburgh). But still not as bad as May 9th in 1966 when Pittsburgh got 3 inches of snow! I took in the figs since I had moved them out of the basement last weekend.
Out of curiosity, a few weeks ago I looked up the Pittsburgh McKeesport Airport (closest official NWS station to where I live) data for the past 30 years to get a sense of when the last freeze and frost generally is. The further into spring you get, the less likely it is to have a freeze or frost. The NWS nicely lists the probabilities for “historically, there has been a 90% chance of it being this cold after this date” from 90% all the way down to 10%. I graphed the data and came up with:
I’m assuming freeze is 32 F or below and frost is 36 or below. I also fit a 2nd order polynomial but honestly as today has showed (freeze on 05/09 when the graph snows a near zero probability of that happening), there are plenty of outliers. Anyhow, I thought the data was interesting and depending on my risk tolerance lets me guess when to put out my plants (in conjunction with a 10 day forecast!).
Background: A few years ago, I got interested in growing the smallest tomato, the Micro Tom as a curiosity, so I grew it in a small 4-6″ pot over the winter. It was super cute and provided a half-dozen tomatoes or so (but I didn’t have very much light, just a few fluorescent tubes), but I never gave it too much serious thought. Since then, I’ve been growing tomatoes like Maskotka, Patio Choice Yellow F1, and Red Robin indoors but never been super happy with any of them. I grew them under HLG QB120 lights. Both Patio Choice and Red Robin were both too lanky so the bottoms didn’t get much light while the tops got too close to the light and burned. They also liked get large, to fall over the side of the container, generally be unruly, which made it hard to harvest. Maskotka were great from a foliage standpoint with short, dense coverage that took great advantage of the light, but despite so much greenery, I never got very many tomatoes. So when I read a blog post on growing micro dwarf tomatoes indoors during the winter, I got intrigued all over again. However, given the variance I’ve see with just the three varieties I’ve tried so far, how to pick which ones to try?
The selection process: There are plenty of micro-dwarf tomatoes to choose from. Curtis at Renaissance Farms has a lot of posts and YouTube videos, but I get the impression every tomato variety is his favorite, so that doesn’t help narrow things down. I also wonder if there is actually that much difference or if all the micro dwarf varieties would be about the same. So I figured it would be worth doing an experiment with a bunch of different varieties to see which worked best for me. Since they are so small, I decided to pick 10 varieties. So, how did I decide?
Availability: Specifically, had to be available from Renaissance Farms’ selections (especially after I discovered Baker Creek was out of Orange Hat).
Under 12″: I only picked varieties that we reported to be under a foot tall because I have HLG QB 120 quantum boards all at the same height so ideally the canopy should be within 6-12″ for even lighting.
Personal inclination: I read over reviews and descriptions and kinda went with what seemed cool.
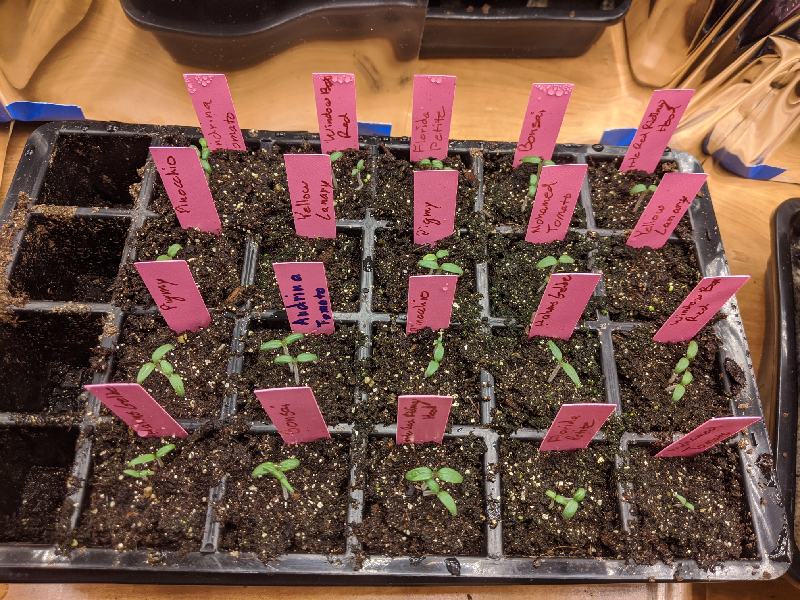
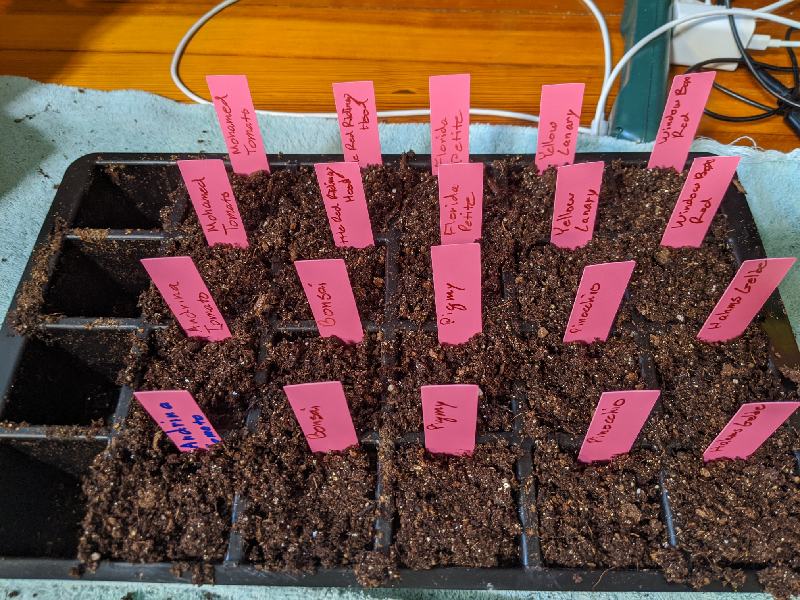
Day 1, planting: I planted out 20 cells of my GrowEase seed starting kit with two cells of each variety, each cell having two seeds. I randomized the placement of the seeds so as to reduce some of the bias. Then it went under an HLG QB120 light.
Evaluation Criteria: So all good experiments have an evaluation criteria: what are we looking for in a good micro dwarf tomato? For each variety, I’ll be checking up on the following things:
Seeds all preped to germinate!
Size: How tall does the tomato plant get? Ideally looking for something under 12″.
Productivity: How many tomatoes does each plant produce? More is better!
Season: How long does it take for each variety to produce tomatoes and how long does each harvest last?
Flavorful: Very subjective, but wanting something tasting better than store-bought tomatoes at the very least.
Robustness: how well does the plant resist disease / insects / etc?
We’ll see how this experiment goes! I’ll try to control for some of the variables, but honestly there are too many (for instance, I should probably have at least 5-10 of each variety for a real experiment). And I haven’t had the best of luck with pests so we’ll see if they even make it to the finish line still reasonably healthy. If nothing else, it should be fun to see how the ones that survive grow and taste. Always an adventure!
After harvesting some beans, planted some Black Vernissage tomatoes in one of my greenhouse sub-irrigated planters.
The tomatoes were quite leggy so I planted them sideways. Also sprayed insecticidal soap for thrips and tried to get the cucumbers to grow back up the trellis 😉
On a strip of rigid insulation foam, red marks empty and green marks full on my sub-irrigated bin.
I’ve been using Sub-Irrigated Planters (SIPs) using 27 gallon storage totes in my greenhouse, office, and basement for a couple years now. They solved the biggest problem I had in the first few years of growing in greenhouses, which was the need to constantly water and if you missed a day, everything wilted, especially if it was hot out! With a several gallon reservoir, I can go days to weeks without watering. However, it still is a bit of an art to know when to water them and how full they are when you are filling them up. In the greenhouse, I’m not as worried since overflow drains away, but the ones in my basement and office I usually err on the side of caution to prevent a big watery mess. This means the SIPs really aren’t operating at their 100% capacity of saving me from watering.
So I wanted something that could measure water level so I knew when the reservoir was running low and when it was about to overflow as I watered it. I found several versions online, such as the IKEA self watering pot or this cool dowel + fishing bobber solution. I didn’t have any bobbers or dowels around (and currently hard to get with the COVID-19 restrictions), but that got me thinking about foam insulation. I had some 1/2″ x 4′ x 8′ XPX foam insulation in the basement and I cut off about 1/2″ x 1/2″ x 2′ strip and then fed it down into the pipe and lo and behold it floated! I pushed it down to the bottom, marked the empty level with red and then filled it up until it overflowed and marked that level with green. It seems to be working pretty well so far!
My two biggest worries are (1) sun deterioration though the UV protection in the polycarb should help with that and (2) absorption of water into the foam, which will throw off my gauge. I might build a bobber + dowel version as well for comparison and see how they do!